Flutter with Atomic Design
with example code for your convenience.

A passionate self-taught engineer.
🔎 Introduction
I had a few projects using Flutter and am still looking for the best practical approach to structure and organize projects efficiently. In addition, I'm thinking about how to make them reusable and easy to maintain when the project grows.
Fortunately, last month I ran into the atomic design from random articles from DailyDev, and it hooked me with an idea of how system design will fit in with the Atomic Design.
📚 What is the Atomic Design
The Atomic Design is an idea proposed by Brad Frost to organize the UIs more efficiently when the project grows and how it is a perfect companion to the design system.
https://bradfrost.com/blog/post/atomic-web-design/
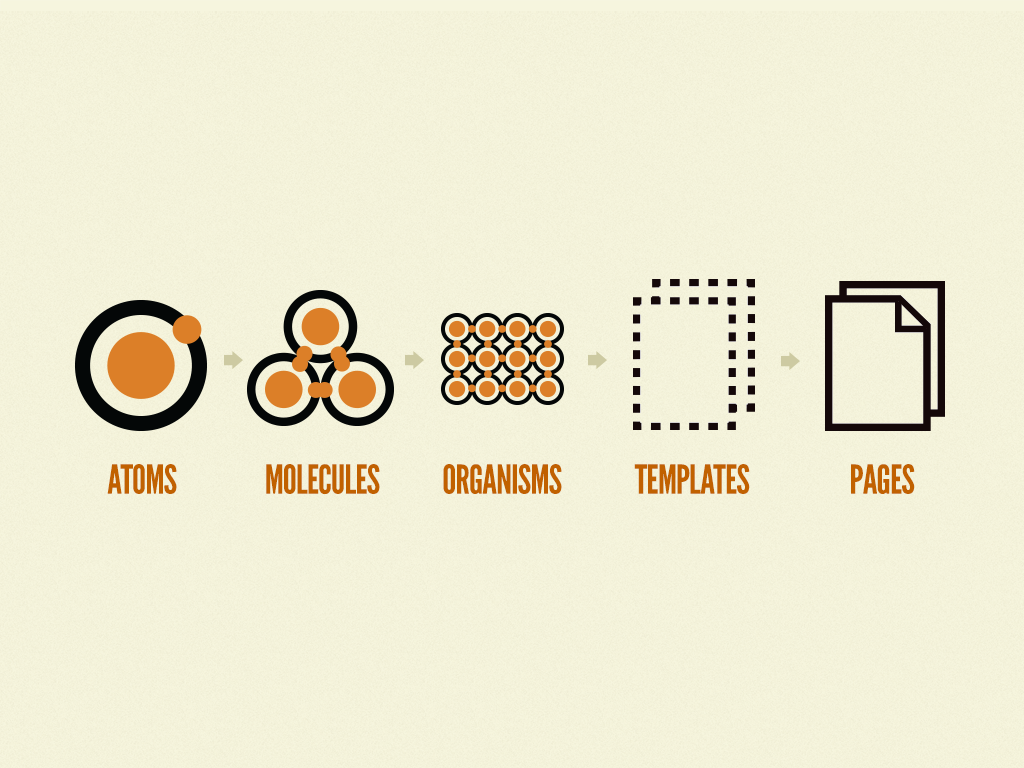
Atomic Design is one of the famous methodologies for creating design systems by using the idea of breakdown components into Atoms, Molecules, Organisms, Templates, and Pages.
I will give you a brief idea of how Atomic Design works, but you can read more detail from this blog.
Atoms
An atom is a single component itself without relying on any other parts. Therefore, it should be small, like an atom, and could be abstract, like input, button, text, etc.
Molecules
A molecule is a combination of multiple atoms into more complex components. For instance, A search box that combines between input and button together.
Organisms
An organism is a group of molecules joined together to be more meaningful as a presentation view, like a menu bar for the top of the page.
Templates
A template has to structure organisms to be a page layout and left slots for dynamic contents fed from a page. It could be a whole layout of the homepage or any other page.
Pages
A page is responsible for filling the templates with dynamic content we need. At this stage, it brings the template to life and is ready to interact with users.
🏗 How to implement with Flutter?
I previously wrote a small detail about the Atomic Design with Flutter of my side project. But I will give you more detail about them in this blog.
Folder Structure
- core/
- modules/
- ui/
-- tokens/
---- colors.dart
---- sizes.dart
---- typography.dart
---- ...
-- foundations/
---- themes/
------ light.dart
------ dark.dart
---- colors.dart
---- sizes.dart
---- typography.dart
---- ...
-- atoms/
---- button.dart
---- logo.dart
---- spacer.dart
---- ...
-- molecules/
---- deck.dart
---- search.dart
---- ...
-- organisms/
---- appbar.dart
---- section.dart
---- ...
-- templates/
---- main_template.dart
---- study_template.dart
---- ...
-- pages/
---- main_page.dart
---- study_page.dart
---- ...
Token
Inside of the token folder, we are going to keep all abstract constants here.
// tokens/typography.dart
class NeuBrainTypography {
  static const String familySF = '.SF UI Display';

  static const double sizeXXS = 10.0;
  static const double sizeXS = 12.0;
  static const double sizeSM = 14.0;
  static const double sizeSL = 16.0;
  static const double sizeMD = 18.0;
  static const double sizeLG = 20.0;
  static const double sizeXL = 24.0;
  static const double sizeXXL = 32.0;
}
Foundation
At this stage, we are gaining to interpret from above abstract layer to be more meaningful as a constant for the UI. The foundation is the only layer that can reference the tokens layer. Other layers will reference the foundation layer without breaking into the token layer.
// foundations/typography.dart
import 'package:neubrain/tokens/index.dart';

class NeuBrainTypographyFoundation {
  static const double bodyLarge = NeuBrainTypography.sizeSL;
  static const double bodyMedium = NeuBrainTypography.sizeSM;
  static const double bodySmall = NeuBrainTypography.sizeXS;

  static const double titleLarge = NeuBrainTypography.sizeXL;
  static const double titleMedium = NeuBrainTypography.sizeLG;
  static const double titleSmall = NeuBrainTypography.sizeMD;
}
Atom
Atom will be only a single simple component. At this layer, we can use constants from the foundation layer.
// atoms/input.dart
import 'package:flutter/material.dart';
import 'package:neubrain/foundations/index.dart';

class Input extends StatelessWidget {
  const Input({
    Key? key,
    this.label,
    this.hintText,
    this.suffixIcon,
  }) : super(key: key);

  final Widget? label;
  final String? hintText;
  final Icon? suffixIcon;

  @override
  Widget build(BuildContext context) {
    return TextFormField(
      style: const TextStyle(
        fontSize: NeuBrainTypographyFoundation.bodyMedium, // Reference to the foundation layer
      ),
      decoration: InputDecoration(
        label: label,
        hintText: hintText,
        suffixIcon: suffixIcon,
      ),
    );
  }
}
Molecule
We will combine the atoms we made into a more complex component.
// molecules/search.dart
import 'package:flutter/material.dart';
import 'package:neubrain/atoms/input.dart';

class Search extends StatelessWidget {
  const Search({Key? key}) : super(key: key);

  @override
  Widget build(BuildContext context) {
    return const Input(
      label: Text('Search'),
      hintText: 'Type to search',
      suffixIcon: Icon(Icons.search),
    );
  }
}
Organism
As I mentioned, the organism will join molecules and atoms (if you need them) into a more significant component.
// orgnisms/appbar.dart
import 'package:flutter/material.dart';
import 'package:neubrain/atoms/button.dart';
import 'package:neubrain/atoms/spacer.dart';
import 'package:neubrain/foundations/index.dart';
import 'package:neubrain/molecules/menu.dart';

class NeuBrainAppBar extends SliverPersistentHeaderDelegate {
  const NeuBrainAppBar() : super();

  @override
  Widget build(
    BuildContext context,
    double shrinkOffset,
    bool overlapsContent,
  ) {
    return Container(
      decoration: BoxDecoration(
        color: Theme.of(context).canvasColor,
      ),
      child: Column(
        children: [
          Padding(
            padding: const EdgeInsets.only(
              top: NeuBrainSizesFoundation.baseSeparated,
              left: NeuBrainSizesFoundation.baseSeparated,
              right: NeuBrainSizesFoundation.baseSeparated,
            ),
            child: Row(
              mainAxisAlignment: MainAxisAlignment.spaceBetween,
              children: [
                Button(
                  child: const text (
                    'NeuBrain',
                  ),
                  onPressed: () {},
                ),
                const Menu(),
              ],
            ),
          ),
          VerticalSpace.small(),
          const Divider(),
        ],
      ),
    );
  }

  @override
  double get maxExtent => 200;

  @override
  double get minExtent => kToolbarHeight;

  @override
  bool shouldRebuild(SliverPersistentHeaderDelegate oldDelegate) => true;
}
Template
The template will construct a layout that leaves some slots for dynamic content.
// templates/main_template.dart
import 'package:flutter/material.dart';
import 'package:neubrain/atoms/spacer.dart';
import 'package:neubrain/foundations/index.dart';
import 'package:neubrain/molecules/search.dart';
import 'package:neubrain/organisms/appbar.dart';

class MainTemplate extends StatelessWidget {
  const MainTemplate({
    Key? key,
    this.sections = const [],
  }) : super(key: key);

  final List<Widget> sections;

  @override
  Widget build(BuildContext context) {
    return Scaffold(
      body: CustomScrollView(
        slivers: [
          const SliverPersistentHeader(
            delegate: NeuBrainAppBar(),
            pinned: true,
          ),
          SliverToBoxAdapter(
            child: Column(
              children: [
                Container(
                  padding: const EdgeInsets.all(
                    NeuBrainSizesFoundation.baseSeparated,
                  ),
                  child: Column(
                    children: [
                      const Search(),
                      VerticalSpace.extraLarge(),
                      ...sections,
                    ],
                  ),
                )
              ],
            ),
          ),
        ],
      ),
    );
  }
}
Page
The page layer will complete the template with dynamic content. It may rely on the API result, but this layer is responsible for structuring the page.
import 'package:flutter/material.dart';
import 'package:neubrain/atoms/spacer.dart';
import 'package:neubrain/molecules/deck.dart';
import 'package:neubrain/organisms/section.dart';
import 'package:neubrain/templates/main_template.dart';

class MainPage extends StatelessWidget {
  const MainPage({Key? key}) : super(key: key);

  @override
  Widget build(BuildContext context) {
    return MainTemplate(
      sections: [
        Section(
          title: 'Decks',
          child: Row(
            children: const [
              Deck(title: 'Deck name'),
            ],
          ),
        ),
        VerticalSpace.extraLarge(),
        Section(
          title: 'Streaks',
          child: Row(
            children: const [
              Deck(title: 'Streak'),
            ],
          ),
        ),
        VerticalSpace.extraLarge(),
        Section(
          title: 'Statistics',
          child: Row(
            children: const [
              Deck(title: 'Statistic'),
            ],
          ),
        ),
      ],
    );
  }
}
💭 Closing thoughts
I used to be familiar with Atomic Design once when I developed the front-end components with React many years ago, and this idea dusts that knowledge off when I try to implement it with Flutter.
It may initially confuse you if you want to try the same idea. The first struggle that I face is the component I just created should be an atom, molecule, or organism. But trust me, when you are trying to get your hand dirty with the actual implementation, it will finally get you some senses and speed up your development.
Get to know me: